
How to Print a Picture for a Locket: Easy Steps & Tips
To print a picture for a locket, resize the image to fit the locket's dimensions. Then, print the resized image using high-quality photo paper.
Lockets are timeless pieces of jewelry that hold sentimental value. They often contain cherished photos of loved ones. Printing a picture for a locket requires careful sizing to ensure a perfect fit. High-quality photo paper ensures the image looks clear and vibrant.
First, measure the locket's dimensions precisely. Then, use a photo editing software to resize the image accordingly. Choose a high-resolution photo to maintain clarity. Print the image on photo paper, cut it carefully, and place it inside the locket. This process preserves precious memories in a beautifully personalized way.
Choosing The Right Picture
Printing a picture for a locket is special. The picture must be just right. This section helps you choose the perfect image. Your locket deserves the best picture. Let's dive into the details.
Selecting A High-quality Image
A high-quality image is essential. It ensures the picture looks clear. Blurry pictures won't look good in a locket. Use a photo with good resolution. Photos from a smartphone camera are great. Digital cameras also work well.
- Make sure the image is sharp.
- Check the lighting in the photo.
- Avoid dark or overexposed pictures.
Remember, the better the quality, the better the locket picture.
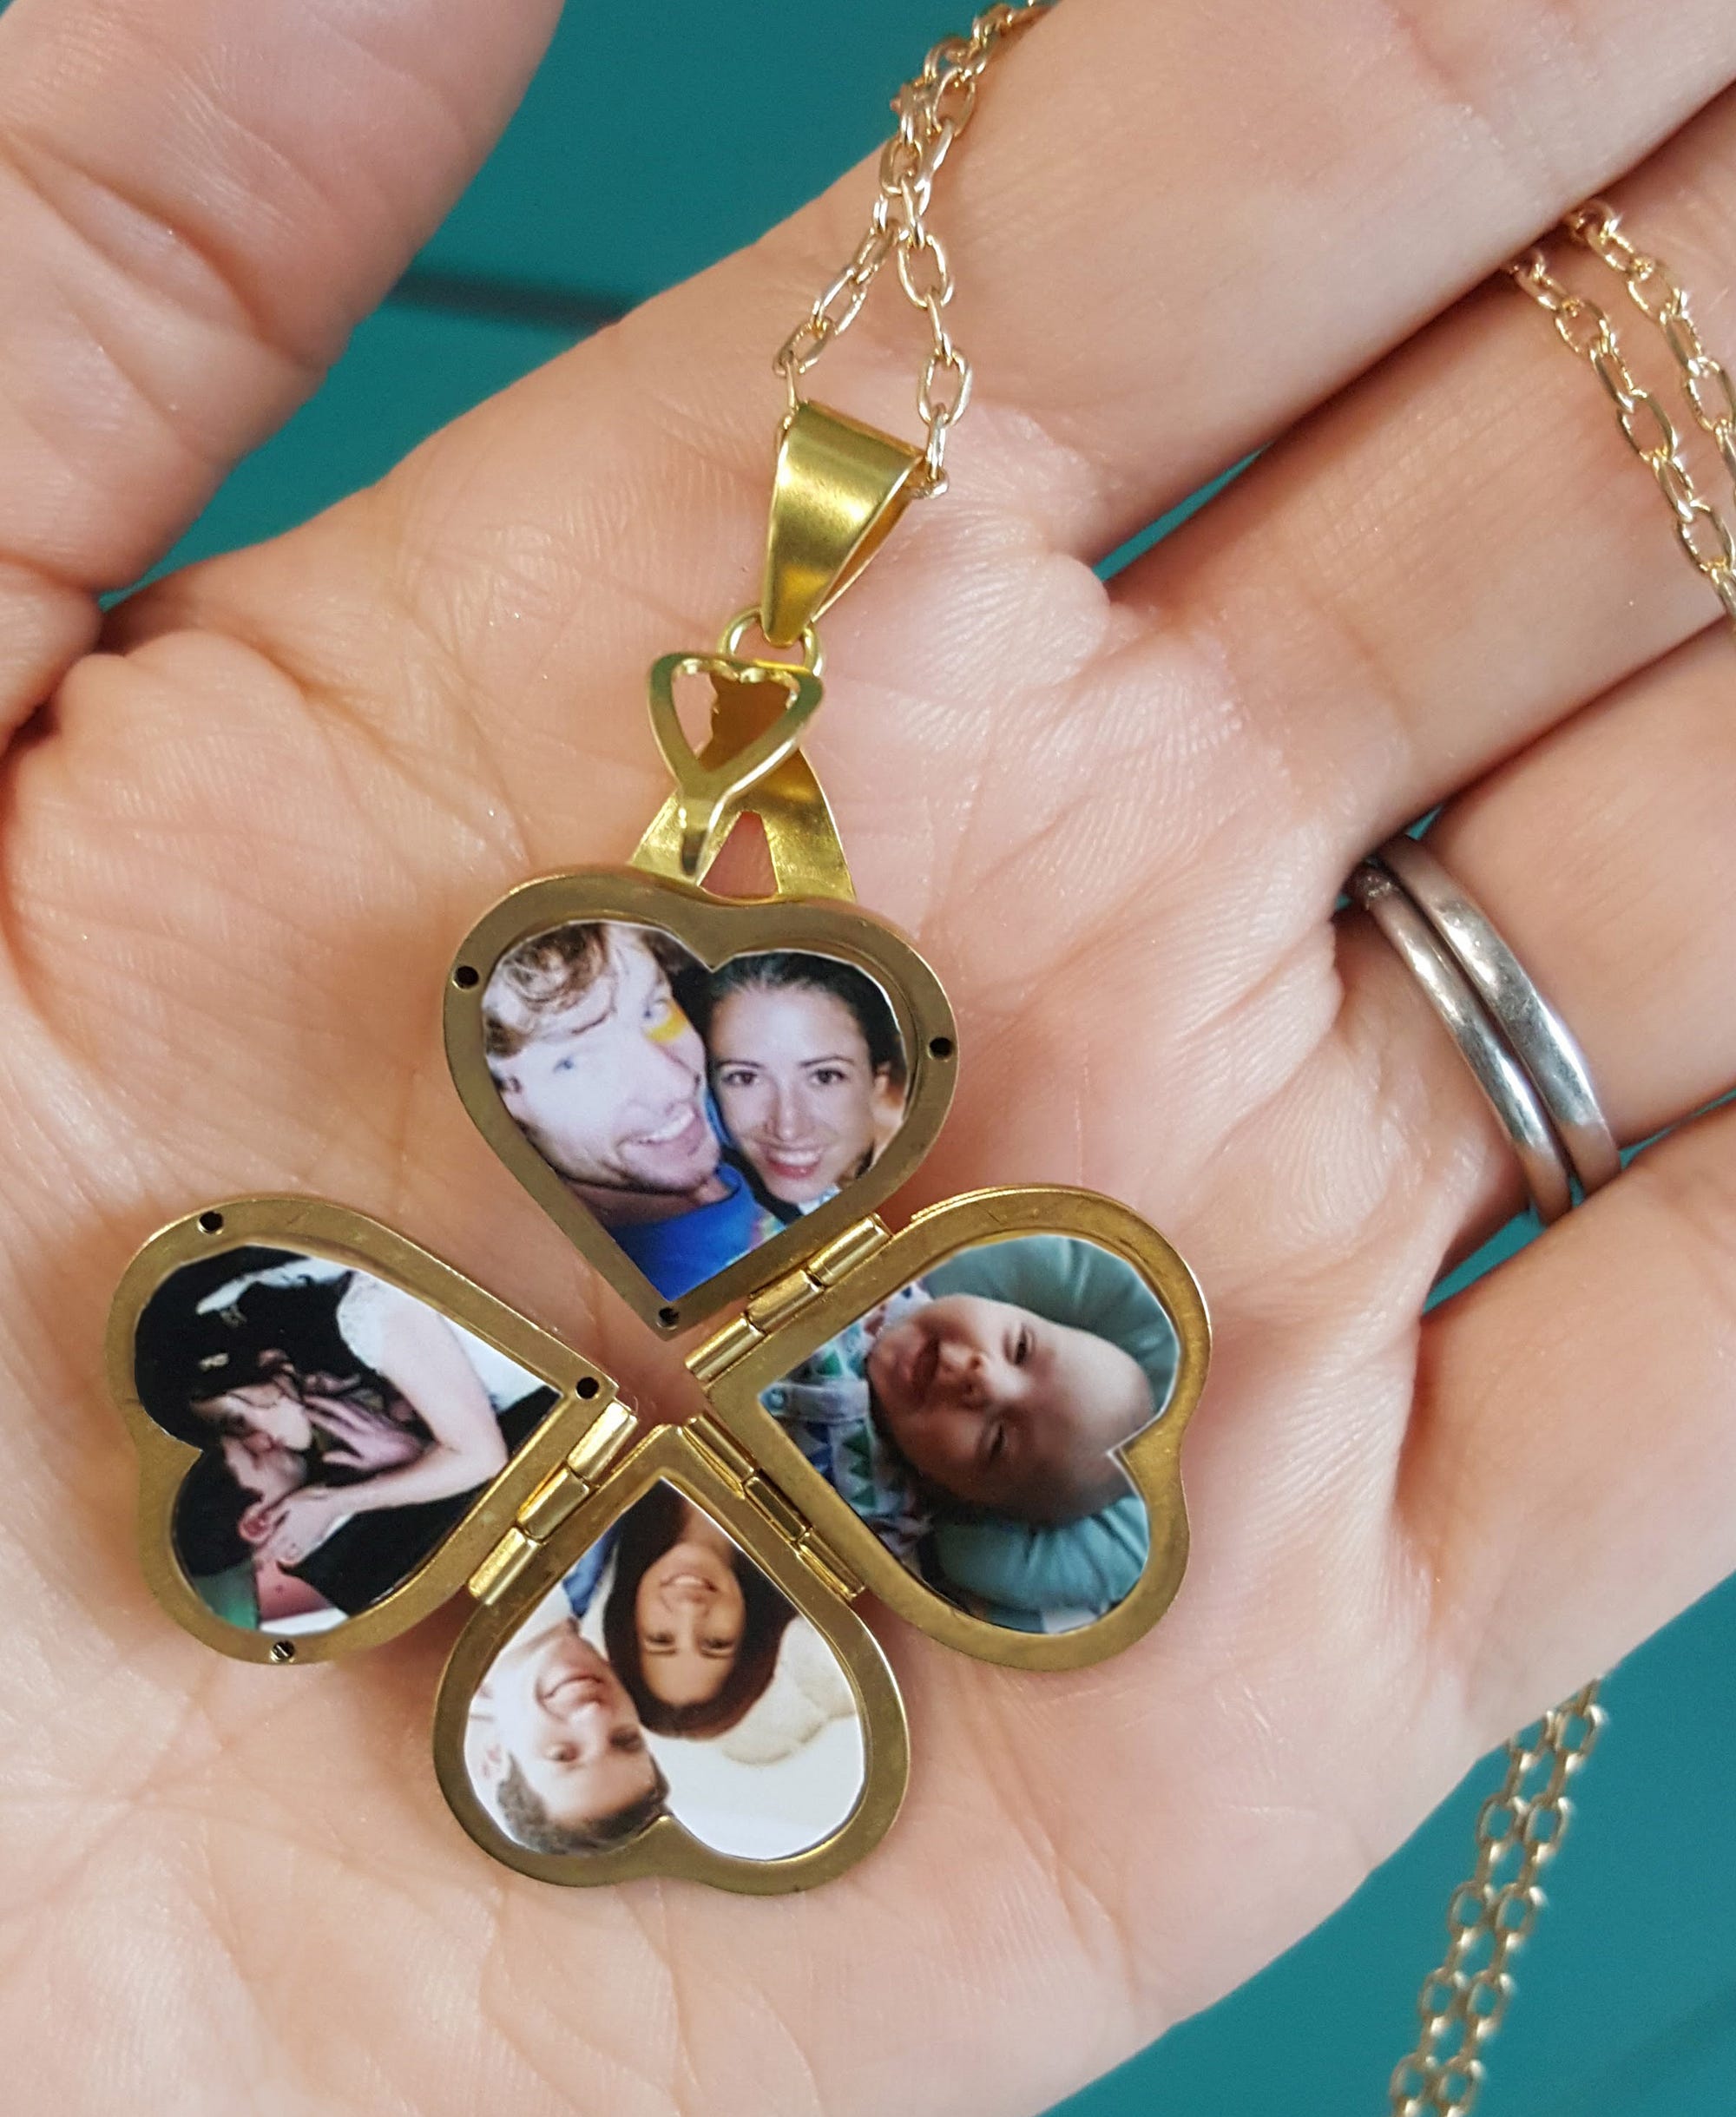
Considering Size And Shape
The size and shape of the picture matter. Lockets are small. The picture must fit perfectly. Measure your locket's dimensions first.
| Shape | Recommended Size |
|---|---|
| Round | 20mm diameter |
| Oval | 20mm x 25mm |
| Heart | 20mm x 20mm |
Use photo editing software to resize the picture. Crop the image to match the locket's shape. Ensure the main subject is centered.
Lockets with unique shapes need special attention. Custom shapes may require custom resizing.
Following these steps helps you choose the perfect picture for your locket. A well-chosen image makes the locket special.

Credit: creativecaincabin.com
Resizing The Image
Resizing an image for a locket can be tricky. The picture must fit perfectly. The process involves making the image smaller without losing quality. Here’s how you can resize your image using online tools or photo editing software.
Using Online Tools
Online tools are user-friendly and quick. They are perfect for beginners. Here are steps to resize an image:
- Upload your image to the tool.
- Select the resize option.
- Enter the desired dimensions.
- Preview the resized image.
- Download the final version.
Popular online tools include:
- Canva: Easy and intuitive interface.
- PicResize: Simple and straightforward.
- ResizePixel: Offers precise dimensions.
Utilizing Photo Editing Software
Photo editing software provides more control. It is suitable for advanced users. Here’s how to resize an image using software:
- Open your image in the software.
- Go to the 'Image' menu.
- Select 'Resize' or 'Image Size'.
- Enter the new dimensions.
- Save the resized image.
Popular photo editing software includes:
- Adobe Photoshop: Best for professionals.
- GIMP: Free and powerful.
- Paint.NET: Simple and effective.
Printing Options
When printing a picture for a locket, choosing the right printing option is essential. You want to ensure the photo fits perfectly and looks stunning. This section will guide you through the printing options available, including the choice between using a home printer or a professional service. We will also discuss the importance of selecting the right paper for the best results.
Home Printer Vs. Professional Service
Home Printer: Using a home printer is convenient. You can print your picture anytime. Ensure your printer has good quality ink. High-resolution images produce better results. Make sure to use photo paper for the best finish. This option is cost-effective and quick.
Professional Service: A professional service guarantees high-quality prints. They use advanced printers and high-grade paper. This option ensures your photo looks stunning. It may cost more but offers superior quality. Professional services can also resize your photo perfectly for your locket.
Choosing The Right Paper
Selecting the right paper is crucial for the perfect photo. Different papers offer different finishes and durability.
| Paper Type | Finish | Durability |
|---|---|---|
| Glossy | Shiny | High |
| Matte | Non-shiny | Medium |
| Luster | Semi-shiny | High |
Glossy paper gives a shiny and vibrant finish. It is durable and looks professional. Matte paper has a non-shiny finish and is less prone to fingerprints. It gives a classic look. Luster paper offers a semi-shiny finish and is a good balance of both. It is also durable and looks elegant.
Choose the paper that best suits your needs. Ensure your photo fits perfectly in your locket and looks amazing.

Credit: www.postsnap.com
Cutting The Picture To Fit
Cutting the picture to fit your locket is crucial. A perfect fit makes the picture look neat and professional. Follow these steps to ensure your picture fits perfectly.
Using A Template
Start by using a template. Most lockets come with a paper insert. This is the shape you need to cut your picture. If your locket does not have one, trace the locket's opening on a piece of paper.
Use this template to outline the area on your picture. Make sure to center the subject of the picture. This ensures the most important part of the picture is visible.
Here is a simple table for clarity:
| Step | Action |
|---|---|
| 1 | Use a paper template from the locket or create one. |
| 2 | Place the template on your picture. |
| 3 | Trace around the template carefully. |
Precision Cutting Tools
Using the right tools is very important. Regular scissors might not give you the precision you need. Use a precision knife or small scissors. These tools allow for more accuracy and control.
Here are some recommended tools:
- Precision knife
- Small, sharp scissors
- Cutting mat (for safety)
Follow these steps for a clean cut:
- Place the picture on a cutting mat.
- Carefully cut along the traced lines.
- Ensure smooth edges by trimming any rough spots.
Using precise tools ensures a perfect fit and professional look. A well-cut picture enhances the beauty of your locket.
Inserting The Picture
Inserting a picture into a locket can be a delightful task. It allows you to carry precious memories close to your heart. Follow these steps to ensure a perfect fit for your cherished photo.
Opening The Locket
First, carefully open the locket. Most lockets have a small hinge on one side. Gently use your fingernail to pry it open.
If the hinge is tight, you can use a small flat tool. Be cautious to avoid scratching the locket.
Once open, you will see a space to place your picture.
Securing The Picture
Place the cut-out picture into the locket's space. Ensure it fits snugly.
Some lockets have a small frame or plastic insert to hold the picture in place. If your locket has this, gently press it over the picture.
If your locket lacks a frame, you can use a tiny piece of double-sided tape. This will help secure the picture without causing damage.
After the picture is secure, carefully close the locket. Ensure it snaps shut completely to keep your picture safe.
Protecting The Picture
Printing a picture for a locket involves more than just resizing and printing. Protecting the picture ensures it lasts a long time. There are several methods to keep your picture safe from damage.
Using A Protective Film
Applying a protective film is a simple way to safeguard the picture. This film acts as a barrier against moisture and dirt. It also prevents the picture from fading quickly.
To apply the film, follow these steps:
- Cut the protective film to the size of the picture.
- Peel off the backing of the film.
- Carefully place the film over the picture.
- Smooth out any air bubbles using a soft cloth.
Laminating Options
Laminating the picture is another effective method. This process encases the picture in plastic, offering sturdy protection.
There are two main laminating options:
| Laminating Type | Description |
|---|---|
| Hot Lamination | Uses heat to seal the picture between two sheets of plastic. |
| Cold Lamination | Does not use heat, relies on pressure to seal the picture. |
To laminate the picture, follow these steps:
- Choose the right laminating type.
- Place the picture in the laminating pouch.
- Run the pouch through the laminating machine (if using hot lamination).
- Trim the laminated picture to fit the locket.
Both methods effectively protect your picture, ensuring it stays beautiful for years.
Common Mistakes To Avoid
Printing a picture for a locket seems simple, but it's easy to make mistakes. Let's explore common errors to avoid for the perfect locket photo.
Incorrect Sizing
One common mistake is incorrect sizing. A locket photo must fit precisely. Too large and it won't fit. Too small and it may fall out or look odd. Use a ruler to measure the locket's size. Then, match your photo dimensions to these measurements. Be sure to adjust your photo size before printing.
Poor Image Quality
Poor image quality ruins a locket photo. Always use a high-resolution image. Low-resolution photos look blurry and unattractive. Ensure your image has at least 300 DPI (dots per inch). This will make the photo look sharp and clear.
Another tip: Avoid using images taken in low light. These can appear grainy when printed. Choose a photo with good lighting and focus. This results in a beautiful locket picture.
Additional Tips
Printing a picture for a locket can be fun. Some additional tips can make it even better. Here are some helpful tricks to ensure your locket picture looks perfect.
Matching The Locket’s Style
Choose a picture that matches your locket’s style. If your locket is vintage, an old photo is best. For a modern locket, a recent picture might work better.
Consider the shape of your locket. If it’s round, pick a picture that fits a circle. For an oval locket, an oval-shaped photo is ideal. You can use photo editing software to crop your picture to the right shape.
| Locket Shape | Photo Shape |
|---|---|
| Round | Circle |
| Oval | Oval |
| Heart | Heart |
Caring For Your Locket
Taking care of your locket is important. Keep it clean to protect your photo. Use a soft cloth to clean the locket. Avoid water and harsh chemicals.
Store your locket in a safe place. A jewelry box is a good option. This keeps it safe from scratches and damage.
- Clean with a soft cloth
- Avoid water and chemicals
- Store in a jewelry box
Check the locket’s clasp regularly. Make sure it closes properly. This keeps your picture safe inside.
- Check the clasp
- Ensure it closes tightly
Credit: medium.com
Frequently Asked Questions
How Do I Print A Picture To Fit In A Locket?
Measure the locket's dimensions. Resize the picture using photo editing software. Print on high-quality paper, then cut to fit.
Where Can I Print Tiny Photos For A Locket?
You can print tiny photos for a locket at Walgreens, CVS, or Walmart. Online services like Shutterfly and Snapfish also offer this option. Just upload your photo and select the size.
How Do You Make A Picture Into A Locket?
To make a picture into a locket, print a small photo. Trim it to fit the locket's size. Place the photo inside the locket and secure it.
What Size Print For A Locket?
A locket print should typically be between 1 to 2 inches. Measure your locket for an exact fit.
Conclusion
Creating a locket picture is simple with the right steps. Follow our guide to ensure a perfect fit. Personalize your locket with cherished memories. Enjoy the process and the lasting impact of your custom locket. Keep these tips in mind for beautiful, lasting results.
Happy crafting!


