
How to Clean Print Heads on Epson Printer: Easy Step-by-Step Guide
To clean print heads on an Epson printer, use the printer's built-in cleaning utility. Access it via the printer's control panel or software.
Maintaining the print heads of your Epson printer is crucial for high-quality prints. Over time, print heads can get clogged with dried ink, causing streaks and poor print quality. Regular cleaning ensures optimal performance and prolongs the printer's lifespan. Epson printers come with a built-in cleaning utility that simplifies this task.
This feature is accessible through the printer's control panel or software installed on your computer. Performing regular cleanings can save you from costly repairs and replacements, ensuring your prints always look their best. Follow these steps to keep your Epson printer in top condition.
Credit: files.support.epson.com
Preparation
Cleaning your Epson printer's print heads can improve print quality. Proper preparation is essential for a smooth cleaning process. Follow these steps to ensure you're ready.
Gather Supplies
- Lint-free cloths
- Distilled water
- Isopropyl alcohol
- Small bowl
- Cotton swabs
- Plastic gloves
Having these supplies ready will make the cleaning process easier. Using the right materials prevents damage to your printer.
Power Off Printer
Turn off your Epson printer before cleaning. Unplug it from the power source. This ensures your safety and prevents electrical issues.
Wait a few minutes after powering off. This lets the printer cool down. Working with a cool printer is safer and more effective.
Accessing Print Heads
To clean your Epson printer's print heads, you must access them first. This process is simple and requires some basic steps. Once you know how to access the print heads, cleaning becomes straightforward.
Open Printer Cover
First, make sure your printer is turned on. Locate the printer cover and gently lift it up. Opening the cover will allow you to see the inside components of your Epson printer. Be cautious while opening to avoid any damage.
Locate Print Heads
After opening the cover, you need to find the print heads. These are usually located on the carriage that holds the ink cartridges. The print heads may be on the left or right side, depending on your Epson printer model.
Here is a simple table to help you locate the print heads based on common Epson models:
| Printer Model | Print Head Location |
|---|---|
| Epson EcoTank | Left side |
| Epson WorkForce | Right side |
| Epson Expression | Center |
Once you have located the print heads, you can proceed with cleaning them. Ensuring you know their exact location makes the cleaning process easier and quicker.
Manual Cleaning
Manual cleaning of your Epson printer's print heads is essential for maintaining print quality. It helps remove clogs and ensures smooth operation. This method is straightforward and requires simple tools.
Use Cleaning Solution
First, gather your materials. You need a cleaning solution, a syringe, and a lint-free cloth. The cleaning solution can be purchased or made at home. A mixture of distilled water and isopropyl alcohol works well.
Turn off your printer and unplug it from the power source. Open the printer cover to access the print heads. Gently move the print head to the center if it's locked.
Fill the syringe with the cleaning solution. Carefully inject the solution into the ink port of the print head. Do this slowly to avoid damaging the print head. Let the solution sit for a few minutes to dissolve any clogs.
Wipe Print Heads
After the solution has sat, use a lint-free cloth to wipe the print heads. This removes any loosened ink or debris. Be gentle to avoid scratching the print heads.
Repeat the process if needed. Sometimes, stubborn clogs need more than one cleaning cycle. Ensure the print heads are completely dry before closing the printer.
Reconnect your printer and run a test print. This ensures the cleaning was effective. If print quality is still poor, you might need to repeat the cleaning or consult a professional.
| Materials Needed | Steps |
|---|---|
| Cleaning Solution | Inject solution into ink port |
| Syringe | Let solution sit for a few minutes |
| Lint-Free Cloth | Wipe the print heads gently |
Manual cleaning is a simple way to maintain your Epson printer. Regular cleaning ensures long-lasting performance and high-quality prints.
Automated Cleaning
Cleaning print heads on your Epson printer is essential for good prints. Using the automated cleaning feature simplifies the process. You can easily fix print quality issues.
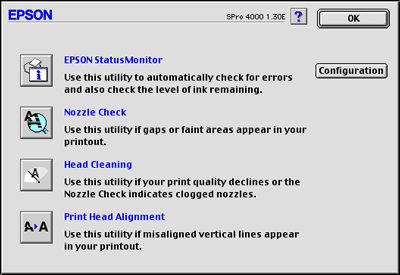
Printer Utility Software
The first step is to use the Printer Utility Software. This software is installed with your printer drivers. You can find it on your computer.
Here's how to access it:
- Open the Start Menu.
- Go to Control Panel.
- Select Devices and Printers.
- Right-click on your Epson Printer.
- Choose Printing Preferences.
- Click on the Maintenance tab.
In the Maintenance tab, you will see options for cleaning. The automated cleaning process begins here.
Run Cleaning Cycle
To run a Cleaning Cycle, follow these steps:
- Click on Head Cleaning.
- Follow the on-screen instructions.
- The printer will start the cleaning cycle.
- Wait for the cycle to complete.
After the cleaning cycle, print a test page. This will help you check if the print quality has improved.
If the print quality is still poor, you might need to run the cleaning cycle again.
Note: Running multiple cleaning cycles uses more ink. Use this feature wisely.
Cleaning the print heads regularly ensures smooth printing. Automated cleaning is a quick and easy solution.
Drying Time
Understanding the drying time is crucial when cleaning print heads on an Epson printer. Proper drying ensures optimal performance and avoids damage. Below are some essential steps to follow for the drying process.
Allow To Air Dry
After cleaning, place the print heads in a clean, dry area. This helps remove any excess moisture.
Do not use heat to dry the print heads. Heat can damage the delicate components. Simply allow them to air dry.
Ensure the print heads are completely dry before reinstalling. This process usually takes a few hours.
Avoid Immediate Use
Do not use the printer immediately after reinstalling the print heads. Give the printer some time to stabilize.
Using the printer too soon can cause ink smudging. It can also lead to poor print quality.
Wait at least 12 hours before printing. This ensures the ink settles properly.

Credit: m.youtube.com
Testing Print Quality
After cleaning your Epson printer's print heads, the next step is to test the print quality. This helps ensure that the cleaning process has worked effectively. Follow these steps to check your printer's performance.
Print Test Page
To begin, print a test page from your Epson printer. This test page will display a variety of colors and patterns. These help you identify any remaining issues with the print heads.
- Turn on your Epson printer.
- Navigate to the printer's menu.
- Select "Maintenance" or "Tools".
- Choose "Print Test Page".
Once the test page prints, carefully examine it. Look for any streaks, missing colors, or faded areas.
Check For Improvement
After printing the test page, it's essential to check for improvement. Compare the test page to previous prints. Look for any differences in quality.
| Issue | Possible Cause | Solution |
|---|---|---|
| Streaks | Dirty print heads | Clean print heads again |
| Missing Colors | Clogged nozzles | Run nozzle check |
| Faded Areas | Low ink levels | Replace ink cartridges |
If you see improvements, your print heads are likely clean. If issues persist, consider repeating the cleaning process.
Testing print quality ensures your Epson printer delivers the best results. Regularly maintain your printer for optimal performance.
Maintenance Tips
Keeping your Epson printer in good shape is important. Regular maintenance ensures clear prints. Follow these tips to keep your print heads clean and working well.
Regular Cleaning Schedule
Setting a regular cleaning schedule is key. Clean the print heads once a month. This helps avoid clogging and ensures smooth ink flow.
Here's a simple schedule to follow:
| Week | Action |
|---|---|
| 1 | Run a print head cleaning cycle. |
| 2 | Check print quality. Clean if needed. |
| 3 | Run a nozzle check. |
| 4 | Deep clean print heads. |
Use Quality Ink
Always use quality ink for your Epson printer. Cheap ink can clog print heads. Quality ink ensures smooth operation.
Benefits of using quality ink:
- Prevents clogs
- Ensures vibrant colors
- Extends printer life
Credit: support2.epson.net
Troubleshooting
Cleaning print heads on an Epson printer may sometimes face issues. Troubleshooting can help fix common problems. Follow the steps to ensure a smooth process.
Persistent Issues
Even after cleaning, some problems may remain. Check for these common issues:
- Streaky prints: Lines or streaks in prints.
- Missing colors: Some colors don't print.
- Blurry text: Text is not clear or crisp.
Ensure the ink cartridges are not empty. Replace them if needed. Verify that the printer heads are properly aligned. Misalignment can cause print issues.
| Issue | Possible Cause | Solution |
|---|---|---|
| Streaky prints | Clogged nozzles | Run a nozzle check |
| Missing colors | Empty cartridges | Replace cartridges |
| Blurry text | Misaligned print heads | Align print heads |
When To Seek Professional Help
If issues persist, consider professional help. Technicians can diagnose deeper problems. Seek help when:
- Multiple cleaning cycles don't work.
- Printer displays error messages.
- There are hardware-related issues.
Professional help ensures proper care and fixes. Experts can handle complex issues that DIY methods can't.
Frequently Asked Questions
How Do I Clean Print Heads On My Epson Printer?
To clean Epson printer heads, open the printer software. Select "Maintenance" or "Utility," then choose "Head Cleaning. " Follow on-screen instructions.
How Do I Run The Clean Cycle On My Epson Printer?
To run the clean cycle on your Epson printer, go to the printer's settings menu, select "Maintenance," then choose "Head Cleaning. " Follow the on-screen instructions to complete the process.
How Do I Get My Printer Heads To Clean Automatically?
Access your printer settings menu. Select the maintenance or cleaning option. Choose "Clean Printhead" and follow the on-screen prompts.
How Do You Make Homemade Printhead Cleaning Solution For Epson Printers?
Mix distilled water and isopropyl alcohol (50/50 ratio). Use a syringe to apply the solution gently. Clean the printhead carefully.
Conclusion
Keeping your Epson printer's print heads clean ensures high-quality prints. Regular maintenance can prevent clogs and extend your printer's life. Follow the steps outlined for an easy and effective cleaning process. A well-maintained printer saves time, money, and hassle, ensuring sharp and vibrant prints every time.
Happy printing!


